FCLLC.maxdesk.us
Apple
About Windows Migration Assistant
About Windows Migration Assistant
Learn about how to use Windows Migration Assistant to migrate your files from a Windows PC to a Mac.Use Windows Migration Assistant to migrate your files from your old Microsoft Windows-based PC to your Mac running OS X Mountain Lion or OS X Lion. Migration Assistant automatically transfers your contacts, calendars, and email accounts and more, and puts them in the appropriate applications.
How to migrate information from a PC to your Mac
What gets transferred, and to where?
Windows Migration copies this information from your Windows PC to your Mac:Email, contacts, and calendar information
| From Windows XP (with SP3 or later) | From Windows Vista (with SP2 or later) | From Windows 7 (with SP1 or later) or Windows 8 | ||||||
| Outlook Express | Outlook | Windows Live Mail | Windows Mail | Outlook | Windows Live Mail | Windows Mail | Outlook | |
| IMAP email account info--to Mail app | ||||||||
| POP email account and messages--to Mail app | Logged-in user | Logged-in user | ✓ | ✓ | Logged-in user | ✓ | ✓ | Logged-in user |
| Contacts information--to Contacts app (Mountain Lion) or to Address Book (Lion) | ✓ | Logged-in user | ✓ | Logged-in user | Logged-in user | |||
| Calendar information--to Calendar (Mountain Lion) or to iCal (Lion) | ||||||||
| Exchange messages--to Mail app | ||||||||
Tip: "Logged-in user" means only the data belonging to the user account that you are logged in to Windows with is transferred. To transfer data from other user accounts, repeat this process while logged in to the other account(s). A new user account will be created in OS X each time you perform a migration.
Important: Windows "Mail app for Windows 8" is not supported. However earlier versions of Windows Mail running in Windows 8 are supported.
Note: You may have to manually quit an application in Windows 8 before using the Windows Migration Assistant. Follow these steps to quit an application in Windows 8:
- Use the Alt-Tab key combination to choose a running application.
- Press Alt-F4 on the keyboard to quit the application.
- Bookmarks from Internet Explorer, Safari for Windows, and Firefox are transferred to Safari in OS X.
- Transferred to iTunes in OS X.
- Transferred your disk; these can be added to iPhoto.Note : After migrating, you should open iPhoto and let it search the disk for photos to import.
- Localization, locale, browser homepage, desktop picture (omitting standard Windows desktop pictures) are transferred to equivalent System Preferences settings in OS X.
- Files from each top-level folder in the logged-in user's home directory will be offered.
- Non-system files (items in \Windows, \Program Files), top-level folders on the user's Windows system disk, and top-level folders on other local disks attached to the Windows PC are also offered.
- Tip: You can uncheck (deselect) anything you do not want to transfer.
Before you begin the transfer process
- To avoid interrupting the migration process, disable automatic installation of updates in Windows.
- Disable any anti-virus software on the PC. Such software may incorrectly identify the Windows Migration Assistant process as suspicious and interfere with it.
- Disable any firewall software on the PC. Firewall software may block needed ports for Windows Migration Assistant to run.
- Run the check disk utility (such as chkdsk) on the PC to make sure it is free of any issues.
- Tip: Select Start > Run… type "cmd" and press Enter. Type "chkdsk" into the command window and press Enter. If the check disk utility reports that it "found problems", enter "chkdsk /F" press Enter. Press "Y" then restart the PC. Repeat this process until the check disk utility reports no issues. If an issue persists after a few repair cycles, you should get the PC serviced before migrating your data to the Mac.
- Make sure you know the name and password of an administrator account. The first account created on the Mac is an administrator account.
- Make sure that both the Windows PC and the Mac are on the same network, such as your home network. These are the preferred network connections, in order:
- Use a CAT6-certified Ethernet cable that is in good condition to connect the Ethernet port of the PC directly to the Ethernet port of the Mac or Ethernet adaptor (USB or Thunderbolt). You shouldn't use an Ethernet cable that has any kinks in it or is missing connector tabs.
- Use CAT6-certified Ethernet cables that are in good condition to connect the Mac and PC to your home network router/hub/switch. You shouldn't use an Ethernet cable that has any kinks in it or is missing connector tabs.
- For wireless, use the fastest wireless signal possible (802.11n 5Ghz). Try to have the PC, Mac, and the wireless access point all in the same room close to each other.
- This process will create a new user account on your Mac that contains the data migrated from the Windows PC. It will not merge the information with any existing user accounts on your Mac.
- This article only applies to migrating from a Windows-based PC to a Mac. For assistance with performing a migration from one Mac to another, please see How to use Migration Assistant to transfer files from another Mac.
- Windows-specific file types, such as .exe files, are not transferred.
- You will need to enter your password when you first use an account, such as when you use your transferred email account in the Mail application for the first time.
Install Windows Migration Assistant on the PC
- On the PC, download the Windows Migration Assistant installer from Apple Support Downloads.
- Install Windows Migration Assistant, then open it.
- Click "Continue" to proceed.

The Windows Migration Assistant will wait for you to open Migration Assistant or use the Setup Assistant. Click below for information about the option you want to use:
Transferring with the Setup Assistant that appears when your Mac starts up for the first time
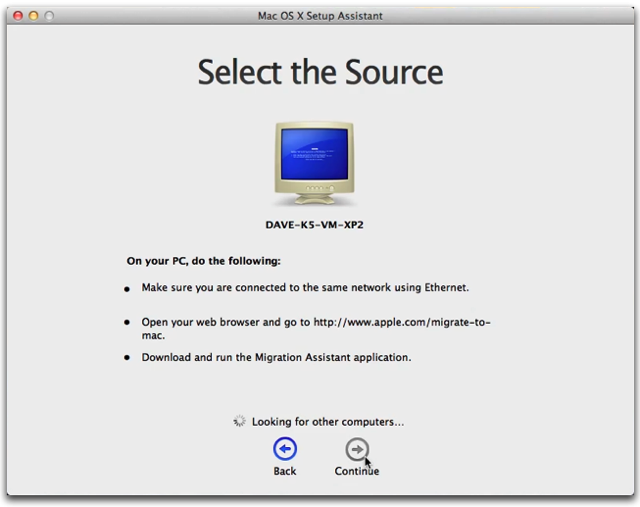
In the Setup Assistant's "Transfer Information to This Mac" screen, select the "From a Windows PC" transfer option.
Select the source Windows PC then click "Continue" to proceed.
The Mac will display a passcode that should appear on the Windows PC.

The Windows PC will display the passcode from the Mac, then click "Continue" to proceed.

On the Mac, select the information to transfer from the Windows PC, then click "Transfer" (once the "Transfer" button is available) to begin the migration process.

On both the Windows PC and Mac you will see a progress bar, messaging about what is being migrated, and estimated time remaining until the process is completed.
After this, complete the OS X Setup Assistant process.
Once completed, you can log in to the new user account.
Note: At your first login on the Mac you will see your account name. Press the Return key and you'll be prompted to reset your password. See Choosing good passwords in OS X for information about how to choose a good password.
Use Migration Assistant after your Mac has started up
If you've already gone through the Setup Assistant process, you can use Migration Assistant at any time to transfer data from a PC to a new user account on your Mac.- On the Mac, open the Migration Assistant located in the Utilities folder. To open it: In Finder, choose Go > Utilities, or press Shift–Command–U (⇧⌘U). Double-click Migration Assistant.
- Select the "From another Mac, PC, Time Machine backup, or other disk" option then click "Continue".

- When prompted, enter an administrator name and password.
- Select the "From another Mac or PC" migration method then click "Continue" to proceed.

- When prompted, click Continue to quit other applications. Other applications can't be open on the Mac during the migration process.
- Select the PC, then wait for the PC to show the passcode displayed on the Mac.

- On the PC, once you see the passcode displayed on the Mac, click "Continue" to proceed.

- The Mac will then begin to inspect your computer and build a list of information to migrate.
- Select the information you would like to migrate to the Mac, then click Continue to proceed.

On both the Windows PC and Mac you will see a progress bar, messaging of what is being migrated and estimated time remaining. Once completed, you can log into the user account created.
Note: At your first login on the Mac you will see your account name. Press the Return key and you'll be prompted to reset your password. See Choosing good passwords in OS X for information about how to choose a good password.
Cet article vous a-t-il été utile ?
0
0
(Connectez-vous pour noter)